Wednesday, January 19, 2022

Mee Goreng (Mi Goreng) - Mayasian, Indonesian fried noodles.

Mee Goreng

Means fried (goreng) noodles (mee). The word Mee is actually the word for noodles in Hokkien (A common Chinese dialect in South East Asia). This quintessential street-food staple is a perfect example of food fusion and evolution. It has a Malay (or Bahasa) name. The noodles, tofu, soy sauce are of Chinese origin. Sambal originated from Java, Indonesia. You will see different variations of this dish throughout South East Asia. This mix was due to the large influx of Chinese and Indian immigrants into South East Asia in the 1800 & 1900s.  

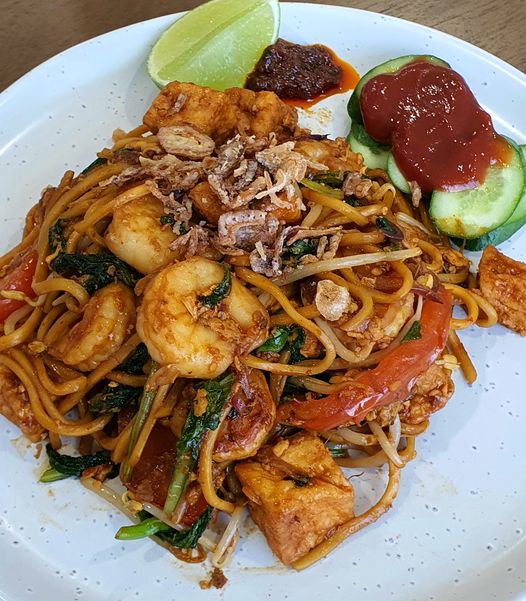
This is my take on a Mee Goreng. This version is closer to the Indonesian style and not the South Indian "Mamak" mee goreng.


This serves 2.

4 cloves garlic
1/2 Purple Onion, thinly sliced
12 raw prawns, peeled and de-veined
1 bunch Choy Sum or preferred Asian green leafy veg
1 handful bean sprouts
1 tomato, roughly chopped
12-16 fried tofu puffs. (I used the small ones - half them diagonally if large pieces)
250 grams fresh thick yellow egg (Hokkien) noodles
1 tbsp soy sauce
2 tbsp tomato sauce
1 tbsp sambal
3 eggs - Beaten.
  • Heat a wok over very high heat
  • Add garlic and onions, fry for about a minute, till a little browning occurs. (1 way to prevent garlic burning is to add it 10-20 secs after the onions). 
  • Add the prawns and cook for about 1 minute. 
  • Add choy sum and toss to coat in the oil. 
  • When the prawns are almost cooked through, add egg and scramble. 
  • Add the tomatoes, tofu puffs, bean sprouts and noodles. Toss for about 2 minutes, or until the tomatoes and tofu soften.
  • Optional Step - You can induce noodle toasting or Wok Hei at this point by laying the noodles around the wok and letting them toast with out tossing them for a minute or 2.
  • Add all the sauces and mix well. 
  • Fry for a another minute or 2 to caramelize the sauces a little.

Garnish with fresh cucumber, wedge of lime and some fried shallots.
Serve hot.
1 tbsp kecap manis

Method

Enjoy!


Monday, February 8, 2021

Lobster Noodles


Lobster Noodles

Saw that the lobster tails were on special at the local supermarket. Bought 4. I didn’t weigh them though. This is a fairly easy recipe and a wok is not a must but recommended. 

We really enjoyed this dish. The sauce is crucial and it was so good.

What you will need:

About 400 grams egg/Hokkien noodles (Cooked weight)
5 stalks spring onion cut to 2 inch lengths
6-8 garlic cloves chopped
1 inch knob of ginger sliced
half a yellow onion sliced
2 tablespoons oyster sauce
2 teaspoons fish sauce
1 tablespoon soy sauce
1/3 cup shaoxing wine
1 cup lobster stock (made with reserved tail shells)
 
Split the lobster tails lengthwise down the middle. 
Remove the meat. Reserve the shells
 
Cut the meat in to 1 inch chunks. Season with a pinch of salt and set aside in the fridge until ready to fry.
 
Lobster stock:
Boil shells with some garlic and a quarter of the spring onion
Set to low simmer for about 20 mins
 
lightly dust the meat in plain flour and shallow fry for 1 - 1 1/2 minutes each side.
Set aside on a cooling rack
 
Heat 2 tablespoons cooking oil in a wok.
Fry onions and noodles in a hot wok with some oil until some charring is present on the noodles. Add a splash of soy sauce
Remove from wok and set noodles aside
 
100 grams of butter in a wok in over medium heat.
When fully melted add in the ginger, garlic and spring onions.
Fry until fragrant and spring onions are fully wilted.
Add the oyster sauce, fish sauce and soy sauce. mix well.
Add Chinese rice wine and stock. Use stock to adjust the viscosity of the sauce to your liking.
Ladle the sauce over the noodles and place fried lobster meat on top.
Garnish with more spring onions if you like
 
Enjoy!

Thursday, December 31, 2020

Fried Egg Noodles with Prawn


Awesome way to use egg noodles. So flavourful and satisfying. Using prawn stock is optional but highly recommended. I honestly eat 2 servings on my own... yeah I know I'm not supposed to.

 
Here is what you will need for 2
 
About 200 grams of egg noodles
About 250 grams of prawns – Peeled and cut into 1cm pieces.
Set the meat aside or in fridge until ready to fry
Bunch of baby spinach or your preferred Asian greens
 
For Prawn stock:
Put the heads and shells in a small saucepan
Add about 1 -1.5 cup of water in saucepan with prawn heads and shells
Bring to a boil and then Simmer over low heat for 10 mins
 
Half a large yellow onion – Sliced
1 stalk chopped spring onions for garnish
8 - 10 cloves of garlic chopped
 
Sauce:
1 tablespoon fish sauce
2 tablespoons soy sauce
2 tablespoons oyster sauce
Mix all the above in a small bowl
 
Method
Heat oil in wok over high heat
Add onions and fry for about 15 seconds
Add the chopped garlic - Fry for about 1 minute or so
Add the prawn meat, fry for about 1 minute
Add the eggs and scramble
Add the spinach and wilt them a little
Add the noodles and fry
Add the sauce and mix well
Add the prawn stock - you may not need all of it
Fry for another 20 seconds or so and you are ready to serve.

Enjoy!

Friday, December 18, 2020

GARLICKY EGG FRIED RICE - NO WOK REQUIRED


A method for garlicky egg fried rice that does not require a wok. A wok is almost always better for fried rice but if you don’t have one or not inclined to use one, this is a viable alternative.
The steps are also easy to follow and stress free.

What you will need:
  • 400 grams cooked short grain rice (refrigerated overnight)
  • Beat 3 eggs with a splash of soy sauce
  • 1 Large yellow onion - chopped up (I used a food processor)
  • 12-15 garlic cloves – chopped
  • 2 stalks spring onions -sliced
  • Soy Sauce
  • Salt and pepper

Method:
  • Heat some oil in a large frying pan over medium-high heat
  • Add the onions - Fry for about 3-4 mins - until they soften a little
  • Add in the chopped garlic
  • Fry for until browned, about 6-8 mins
  • When onions and garlic are browned and fragrant - Remove from pan and set aside
  • In the same pan - add the rice on a Medium high heat
  • Allow the rice to fry and dry out a little in the pan
  • After about a minute add the beaten eggs
  • Mix well, coating the rice grains with egg
  • Add the fried onions and garlic when eggs are almost cooked through
(Note if you adding a pre-cooked protein/meat - add it at this point.)
  • Add about a tbsp of soy sauce
  • Salt and pepper to taste
  • Turn of the heat and mix in the spring onions
Serve and enjoy!


Friday, December 11, 2020

SPICY MINCE BEEF WITH THAI BASIL STIRFRY. (PAD KAPRAO)


Pad Kaprao - My favourite dish when I was living in Thailand. Chicken and Pork variants are the most common, but I love the minced beef variant the most. It’s a typically very spicy dish, a big part about what I love about this dish. The deep fried egg just makes it even more enjoyable. 

It actually made using Holy Basil (Kaprao) but couldn’t get my hands on any so I used Thai basil instead. 

I just bought a couple of very young Holy Basil plants. I will upload a version using holy basil when I get a good harvest of leaves of the plants. (Fingers crossed)

300 grams of beef mince
150 grams long beans

To make the sauce:

  • 1 tbsp oyster sauce
  • 1 tbsp dark soy sauce
  • 1 tbsp light/regular soy sauce
  • 1 tbsp fish sauce
  • 2 tsp sugar
  • 1 tbsp water
Mix all the above in a bowl

  1. Separate the leaves of 1 bunch Thai basil
  2. Cut 150 grams of beans into 1 cm pieces
  3. Dice half an onion
  4. Slice 1 large chilli
  5. Slice 8 bird's eye chillies (Reduce or increase to your preference)
  6. Chop 6 garlic cloves
  7. 300 grams of beef mince
  8. Season with salt and pepper

Method:

Fry an egg, Thai street style (It just means use more oil and high heat, almost deep frying)

  1. Oil in hot wok with high heat
  2. Fry chillies and garlic until garlic is golden brown and aromatic
  3. Add beef mince into the wok - break the mince up
  4. Add the beans and onion into the wok
  5. Add sauce and mix well
  6. Turn off heat and mix in basil leaves

Ladle onto steamed rice – making sure to get some of the sauce.

I hope that you enjoy this dish as much as I did!


Sunday, December 6, 2020

Spicy Asian Lamb Cutlets


I ordered the rack of lamb online. It was everything I expected when it arrived. Was afraid to screw up the lamb so I decided to try sous vide this time. Pairing it with an awesome fish sauce caramel (inspired from my visits to Chin Chin in the Melbourne CBD). The results where amazing. Charred tender lamb that is sweet, sour and savoury at the same time.
 
1kg rack of lamb - I cut it into 2 bones per cutlet
 
For the marinade:
2 tbsp Garlic powder
2 tbsp onion powder
1 tsp ginger powder
1 tsp chilli flakes
2 tbsp fish sauce
2 tbsp soy sauce
3 tbsp kecap manis
Juice of 1 lime
1 tsp white pepper powder
1 tbsp water


Mix all the above in a bowl.
Put in with lamb in resealable bag and leave in fridge overnight.

For the Fish Sauce Caramel
slice 1 stalk lemon grass
slice 4 kaffir lime leaves
slice 1 knob of ginger
1 handful of Thai basil
250 grams dark brown sugar
half cup of fish sauce
50 ml water
1-2 star anise

Method:

Fish Sauce Caramel

  1. Put all the above in a small pot or saucepan
  2. Bring to a boil over stove
  3. Reduce heat to low and simmer for 15 mins
  4. When cooled down, strain into a jar and store.
  5. It keeps in the fridge up to 3 weeks.
  6. Strain into jar and store in the fridge up to 3 weeks

Cooking the Lamb
  1. Cook the lamb in a water bath at 59 degrees Celsius for 1.5-2 hours. (For medium)
  2. I started the charcoal fire 20 mins before searing
  3. I used a charcoal BBQ but a cast iron skillet or huge blow torch would work too.
  4. Grill the cutlets fat side down first. Then char-grill the rest of the surface area.
  5. With sous-vide the lamb is already cooked to the temp that you want you do not want to cook the cutlets further. Just want to get some nice charring on.
  6. When at desired charring, remove from heat and plate.
  7. Drizzle fish sauce caramel liberally .

Enjoy!


Thursday, December 3, 2020


This is a simple chicken stir-fry and I don't feel like using a wok. Your basic East Asian ingredients and sauces. A dish that anyone can put together.

Ingredients that you'll need:

500gm chicken thighs - - cut to 2 cm pieces
1 red capsicum - cut to 2 cm pieces
1/2 yellow onion - cut to 2 cm pieces
2 bird's eye chillies - sliced
4 garlic cloves - chopped
1 knob of ginger - sliced
1 stalk curry leaves
(There was broccoli stem in the video, I just happened to have some around)

Chicken marinade 1 tbsp soy sauce 1 tbsp Shaoxing wine 1 tbsp corn starch 1 tbsp sesame oil 1/2 teaspoon white pepper powder (or to taste) Sauces added into stirfry 2 tbsp soy sauce 2-3 tbsp oyster sauce 1 tbsp sesame oil 1 tbsp Shaoxing wine Optional suggestions Add 1 -2 tablespoons of dark soy sauce for some colour and sweetness

Method:
  • Mix the cut chicken with all the marinade ingredients.
  • leave in the fridge for at least an hour, up to overnight.
  • When ready to start frying, take chicken out of the fridge.
  • In a large frying pan or wok, heat some oil over medium high heat.
  • When oil is hot, add chicken pieces into the pan.
  • Cook for about 15 mins until almost cooked through and there is some browning on the chicken.
  • Remove from the pan and set aside.
  • Wipe the pan down
  • In the same pan, add some oil and heat pan - Medium high heat.
  • Fry garlic and curry leaves till fragrant - about 2-4 minutes
  • Fry rest of the vegetables till lightly browned
  • Chicken back in the pan and cook through
  • At the end, add all the stir fry sauces.
  • Mix well for another 1-2 minutes.
  • Serve with steamed rice.

Enjoy!


Saturday, November 28, 2020

5 Spice Chicken Rice


I always make this when I have a hankering for Singapore style Hainanese Chicken Rice.

Its like a shortcut so I don't have to go through the process of roasting or poaching a whole chicken. Especially when we cook for two most of the time. Also we prefer dark meat so we just by thighs from the local poultry shop for convenience. 

The marinade gives the chicken thighs that extra savory hit that is just so good. It reminds me of the roasted variant of Hainanese Chicken Rice.

For the marinade (Good for about 6 thighs)

  • 4-5 tbsp soy sauce
  • 1 tbsp rice wine vinegar
  • 2 tbsp Shaoxing wine
  • 3 tbsp Sesame oil
  • 1 tbsp onion powder
  • 1 tbsp garlic powder
  • 1 tsp ginger powder
  • 1/2 tsp 5 spice powder
  • 1/2 tsp white pepper powder
  • 50-70 ml water

For the dressing/sauce (2 Servings)
  • 1 tsp sugar
  • 2 tbsp soy sauce
  • 1 tbsp sesame oil

Method

  1. Mix the marinade ingredients in a large bowl: 
  2. Mix chicken thighs with marinade and store in a container or zipper bag. 
  3. Leave in the fridge to marinade or at least an hour, overnight if possible.
  4. When ready to cook, preheat oven to 190 C (fan forced)
  5. Cook chicken skin side up for about 25 mins. Cooking time may vary with size of meat and oven type.
  6. When cooked, remove chicken thighs from banking try and allow to rest while you make the dressing.
  7. Mix all ingredients well in a small bowl, making sure sugar is dissolved.
  8. Serve with chicken rice (Rice cooked with Chinese style chicken broth) or plain rice.
  9. Add on your preferred side greens.
  10. Drizzle the dressing on the chicken and greens. 
Enjoy.

Friday, November 27, 2020

Mushrooms and Rösti, topped with an egg.


Rösti or rööschti - A type of potato fritter from Switzerland. Similar to a hashbrown I guess. but usually cook in a pan instead of a deep fryer.

We had potatoes and mushrooms in the house, wanted to jazz them up a little. Spring onion and thyme were from our back yard.

I made this one thin as I wanted it crispy. This is thinner than a traditional rösti I guess. Haven't had or made that many to be 100% sure. Those that I have had were thicker and larger. Important to get the mushrooms browned to intensify the flavour. Recipe: 1 Large Potato ~ 250 grams (Julienne or grated) Half and medium/small onion (finely chopped/diced) 2 garlic cloves (finely chopped) 6 mushrooms ~ 250 grams(sliced) knob of butter 2-3 sprigs of thyme 1 egg

Method:

1. Fry egg sunny side up.

Potato
2. Heat a flat fry pan with some oil. 3. Put potatoes in pan set to medium heat.
4. Cook until both sides are crispy.

Mushrooms
5. In a separate pan heat some oil over high heat.
6. Then add onion and garlic. Fry till softened and light brown.
7. Add mushrooms and fry until browned.

Assembly -

8. Mushrooms on the potato and top with fried egg.
9. Garnish with fresh herb of your choice.

Also, a short cut would be to use frozen/store-bought hash browns and just cook the shrooms yourself. Also, grate the potatoes if you don't want to julienne them.

Pad See Ew - My first video post

Pad See Ew - Flat rice noodle stir fried with gai lan, bean sprouts, egg, garlic, soy sauce, fish sauce, kecap manis, oyster sauce. Used rendered pork fat as the cooking fat, Used a seared a scotch fillet as the main protein. Still fairly new at the whole video while cooking thingy. Love the flavour of this quintessential Thai street dish. Much like Char Kway Teow in SG.

Video here - https://youtu.be/oPD8RXSIAYk


What you will need to serve 2

2 tbs extra pork lard or vegetable oil

6 cloves garlic - chopped

200-300 grams beef sirloin that I pan seared till medium rare beforehand

3 eggs - beaten

200-300 grams flat rice noodles (Kway Teow or Cheong Fun)

2 tbsp soy sauce

1 bunch gai lan cut into 5cm lengths

50 grams bean sprouts (optional)

2 tbsp kecap manis

2 tbsp oyster sauce

2 tbsp crispy shallots


1.     In a work or large skillet, heat the lard (or oil) on medium heat.

2.     Once oil or lard is hot, add the garlic. Fry till fragrant (a hint of sulphur).

3.     Turn up heat to high.

4.     Add the eggs and scramble. 

5.     Once the eggs are almost cooked through add the noodles and stir fry. 

6.     Mix well and then add the soy sauce, beef and bean sprouts.

7.     Add the kecap manis and oyster sauce.

8.     Stir Fry and then add the gai lan and fry till the sauce caramelizes a little. 

9.     Turn off the heat and serve immediately. 

10. Garnish with fried shallots and chillies if desired. 


Enjoy!

Tuesday, December 18, 2018

Prawn Noodles

Hokkien Prawn Noodles / Har Mee


A mainstay of the street food scene in Singapore and Malaysia. The dish is Hokkien noodles served in a stock that is made with pork bones and prawn heads/shells which gives it its unique flavour. The stock is sweet and savoury at the same time, which leads to lovers of this dish slurping to the bottom of the bowl.

Each family will have their own version of this dish. This is my version of the dish, a variant of my mom's recipe. She didn't really give me a recipe though. This is based of what I remember while watching her cook, plus some tweaks of my own. Being a meat lover, I serve this with braised pork ribs.

Also, when I serve this dish, I don't like shells on my prawns. Many famous stalls that leave the shells on, even after butterflying the prawns. Its a personal preference, I am using chopsticks and I don't really want to be putting them down to shell the prawns or to be spitting shells throughout my meal. I find it very distracting.

What you will need to serve 4 - 6

Stock:
Pork Bones - About half a kilo at least.
Prawns - About 600 grams - Shelled, save the heads and the shells. Store flesh separately.
Pork Ribs - About 600-800 grams - Cut to individual rib bones.
White peppercorns - 1 Tablespoon
Garlic - 1 bulb or a dozen cloves - Lightly crushed.
Oyster Sauce - 3 Tablespoons
Dark Soya Sauce - 1 Tablespoon
Light Soya Sauce - 2 Tablespoons
1 Chicken Stock cube
Sugar - 1 Tablespoon

Noodles and Garnish:
Fried Shallots (Store bought is fine)
Crispy Fried Pork Lard bits (Optional)
KangKong (Water Spinach) - Washed, cut to 4 cm lengths. About a handful per serving,
Beansprouts - About 100 grams. About a handful per serving,
Chilli Powder / Fresh Chillies - Optional
100grams - Egg Noddle or Hokkien Noodle per serving.

Making Lard Cubes. (About .5 Kg of Pork Lard is a good amount)

The Pork Lard is optional. It is my opinion that it just takes the dish to another level. Cut the pork fat into 1 cm cubes or slightly larger. In a pan, slowly heat up the cubed fat. The lard cubes will start to sweat and you will see liquid fat will start to pool in your pan. Keep the heat medium low. Before long, the cubes will be swimming in oil. At this point you can turn up the heat to get a good browning on the cubes. Do not walk away if you can help it - as they can burn very quickly from this point.

Once you get a nice brown colour on the cubes, separate the solids from the liquid fat.

I like to store the crispy cubes in a paper-lined air tight container and the liquid fat in glass container.

The liquid fat stores well in the fridge. Up to weeks. Try using them in your stir fries, its next level stuff. 1 thing to note when using pork fat with stir-frying, us a smaller amount than you would with regular cooking oil, or your dish might get a tad greasy.

Making the stock:

Heat up 2-3 Tablespoons of oil (or Pork Fat - recommended) in a large stock pot or a wok. Add the garlic, white peppercorns, ginger and the prawn heads/shells and roast till the shells turn pink/red and garlic just starts to brown. Add the oyster sauce and continue roasting. You want the oyster sauce to start caramelizing but not burn.

If you are doing the roasting directly in the stockpot, add in 2.5 litres of water.

If using a wok or frying pan - deglaze with some water, about half a litre or so. Bring to a boil and then transfer to a large stockpot then add the rest of the water into the pot.

Add the pork bones, chicken cube, sugar, Light and Dark soya sauce into the pot.

Cover and bring to a boil. Then lower the heat and let simmer for 2 hours.

Tates and adjust as needed with Soya Sauce, pepper and sugar.

Optional Step - Strain the stock. Save the pork ribs and you can discard the rest of the solids.

Or you can just pick out the ribs with and strain the stock as you ladle it into serving bowls.


When Serving:

Have large pot of boiling water ready.

Blanch/cook each serving of noodles according to package instructions and place in the serving bowl.
Blanch/cook each serving of the beansprouts and kangkong and place in the serving bowl.
Blanch each serving of prawns in the stock for 2-3 minutes and place in the serving bowl.(Be careful not to overcook).
Place desired amount of pork ribs in each serving bowl.
Ladle hot stock into the bowl.
Garnish with Shallots, Crispy Lard Cubes and Chillies as desired.

Enjoy....

Thursday, June 14, 2018

Grilled Lemon Grass Chicken


Grilled Lemon Grass Chicken

I was actually inspired by a Vietnamese noodle/salad bar in South Australia. The fragrant aroma of the chicken being grilled was what drew me into that little stall in the Adelaide CBD.

Its savoury, sweet and fragrant. This dish is an easy crowd pleaser, especially in a barbecue. When cooking at home in the oven, the aroma just fills the place. It is actually a variation of the chicken recipe in the Thai Chicken Salad I posted some time ago.

Here's what you'll need.

500g boneless chicken thighs

Marinade
2 stalks fresh lemongrass - grated/minced
1 tablespoon fish sauce
1 tablespoons soya Sauce
1 teaspoon coriander powder.
1 tablespoon olive oil
4 cloves garlic - grated/finely minced
Ground black or white pepper
Juice of half a lime

Garnish / Coating
2  Tablespoons Thai sweet chilli sauce
1 stalk spring onion - sliced
Fried shallots

Method
1. Mix all marinade ingredients in a small mixing bowl. Then marinade chicken in the mix, for at least an hour.

2. If using an oven, preheat oven to 190 degrees. Lay the chicken on a baking tray skin side up. Cook for 25-30 mins. (If you want crispier skin, you can sear the skin on a skillet over the stove over high heat for a few mins before putting the chicken in the oven.)

3. If cooking over a grill or barbecue, cook skin side down first, over medium heat. Should take about 6-10 mins (Depending on how hot your grill is) to get that nice rendering you want on the skin. Then flip them over, grill until cooked through. About another 4-8 minutes or so.

4. Let the chicken rest for a few mins. Toss with the spring onions, shallots and Thai sweet chilli sauce. Serve.

Enjoy.
Related Posts Plugin for WordPress, Blogger...